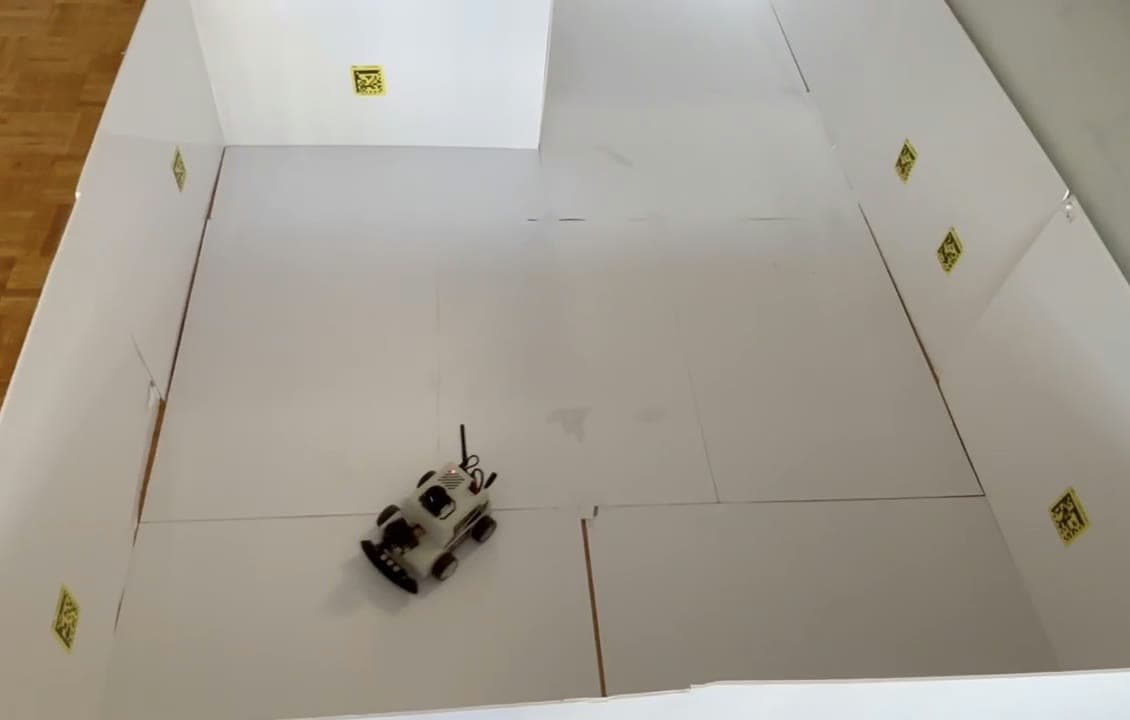
The robot mid-run in my test arena. The yellow markers are the QR checkpoints it scans to confirm which room it has reached.
System architecture
Platform hardware
Navigation loop
- LOCALIZEAMCL · pre-mapped home
- PLANNav2 → the named room
- DRIVEDWB · re-plan on obstacles
- SENSEred-tape + furniture CV
- ARRIVEQR checkpoint · 10-digit ID
The robot runs ROS 2 on a Raspberry Pi 5. I built the assistive-navigation layer (three application nodes) on top of the Yahboom platform's vendor stack (the sensor drivers, EKF localization, SLAM mapping, and the Nav2 navigation pipeline), which is what let me spend my effort on the navigation logic instead of re-solving mapping and motion control. room_navigator turns a named room into a Nav2 goal pose; red_tape_detector injects floor-hazard no-go regions into the costmap; and a furniture detector keys on room objects by colour, shape, and pattern.
ROS2 node graph
Sensor drivers
Localization & mapping · vendor stack
Application layer · my nodes
Nav2 navigation · vendor stack
Base
Problem
Navigating tight domestic spaces is hard for wheelchair users, and the repetitive trips (kitchen, bathroom, bedroom) add up to real daily strain. I set out to prototype the software for an assistive "smart wheelchair": a system that could map a home, localize within it, detect and route around obstacles, flag floor-level danger zones, and drive a user from wherever they are to a room they name, safely, and with a check that it actually arrived.
My role
I designed and built this end to end. I wrote the navigation system and the whole application layer on top of the robot's ROS2 stack: the room-to-room route planning, the computer-vision detectors for floor hazards and furniture, the QR-checkpoint arrival logic, and a parallel software simulation of the entire navigation loop. The workflow diagram below is mine.
I built on a standard robotics foundation. The Yahboom Raspberry Pi 5 platform ships a ready-made ROS2 stack (Nav2 navigation, SLAM mapping, the Astra depth-camera and lidar drivers, EKF sensor fusion), which is exactly what let me put my effort into the assistive-navigation logic instead of reinventing mapping and motion control.
Approach
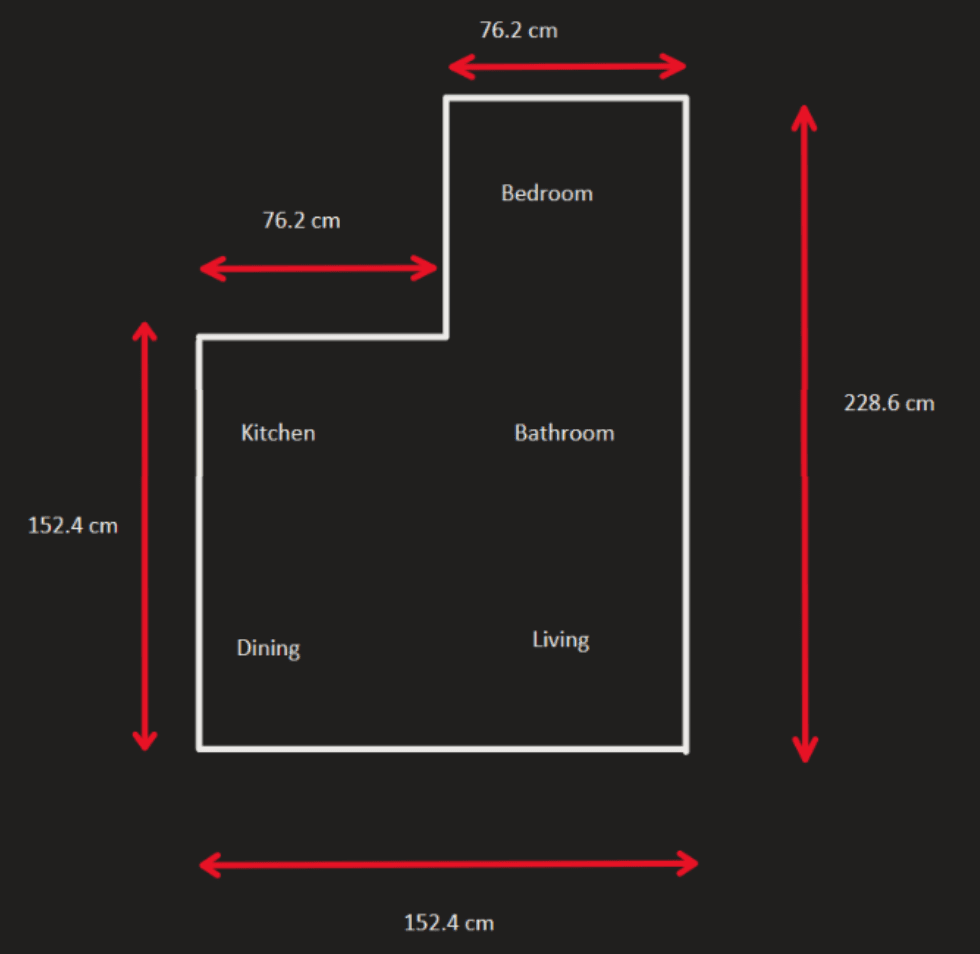
The five-room test "house" I taped out and mapped: the layout the robot planned and navigated against.
The robot first builds a 2D map of the space with its onboard lidar, then localizes against it. On a "go to the bedroom" command, a custom ROS2 node I wrote looks up the room's recorded coordinates and hands them to Nav2 to plan the route, and when the lidar sees an obstacle within ~0.5 m of the planned path, Nav2's costmap flags it and the planner routes around it rather than stopping dead.
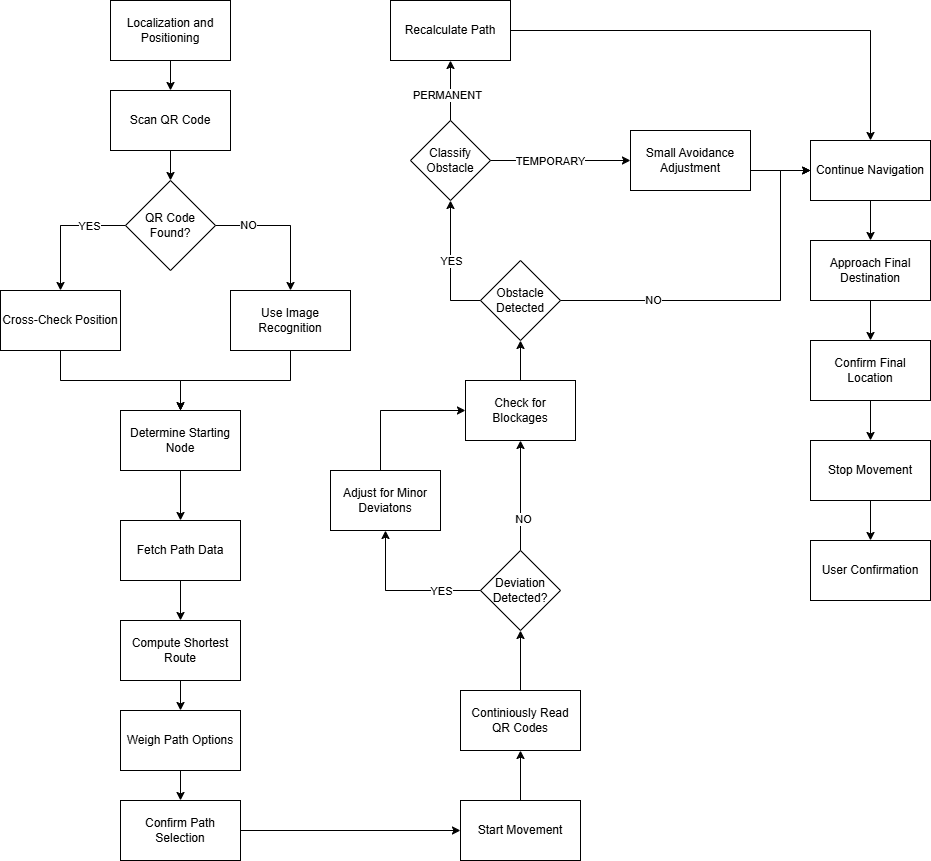
The navigation decision logic I designed: localize → scan a QR code to fix the start → compute the shortest route → drive while continuously re-reading QR codes for drift, branching a detected obstacle into a small avoidance nudge (temporary) or a full re-plan (permanent).
Two computer-vision pieces run alongside the planner. A red-tape detector segments red floor tape (a stand-in for stair edges and other hazards) using two HSV colour bands (so it survives changing light) with morphological cleanup, at 10 Hz, so the planner can treat those regions as no-go. A furniture detector combines colour, shape, and pattern cues to identify objects in a room. And at each destination, the robot scans a wall QR code carrying a 10-digit location ID to verify it reached the room it was actually headed for.
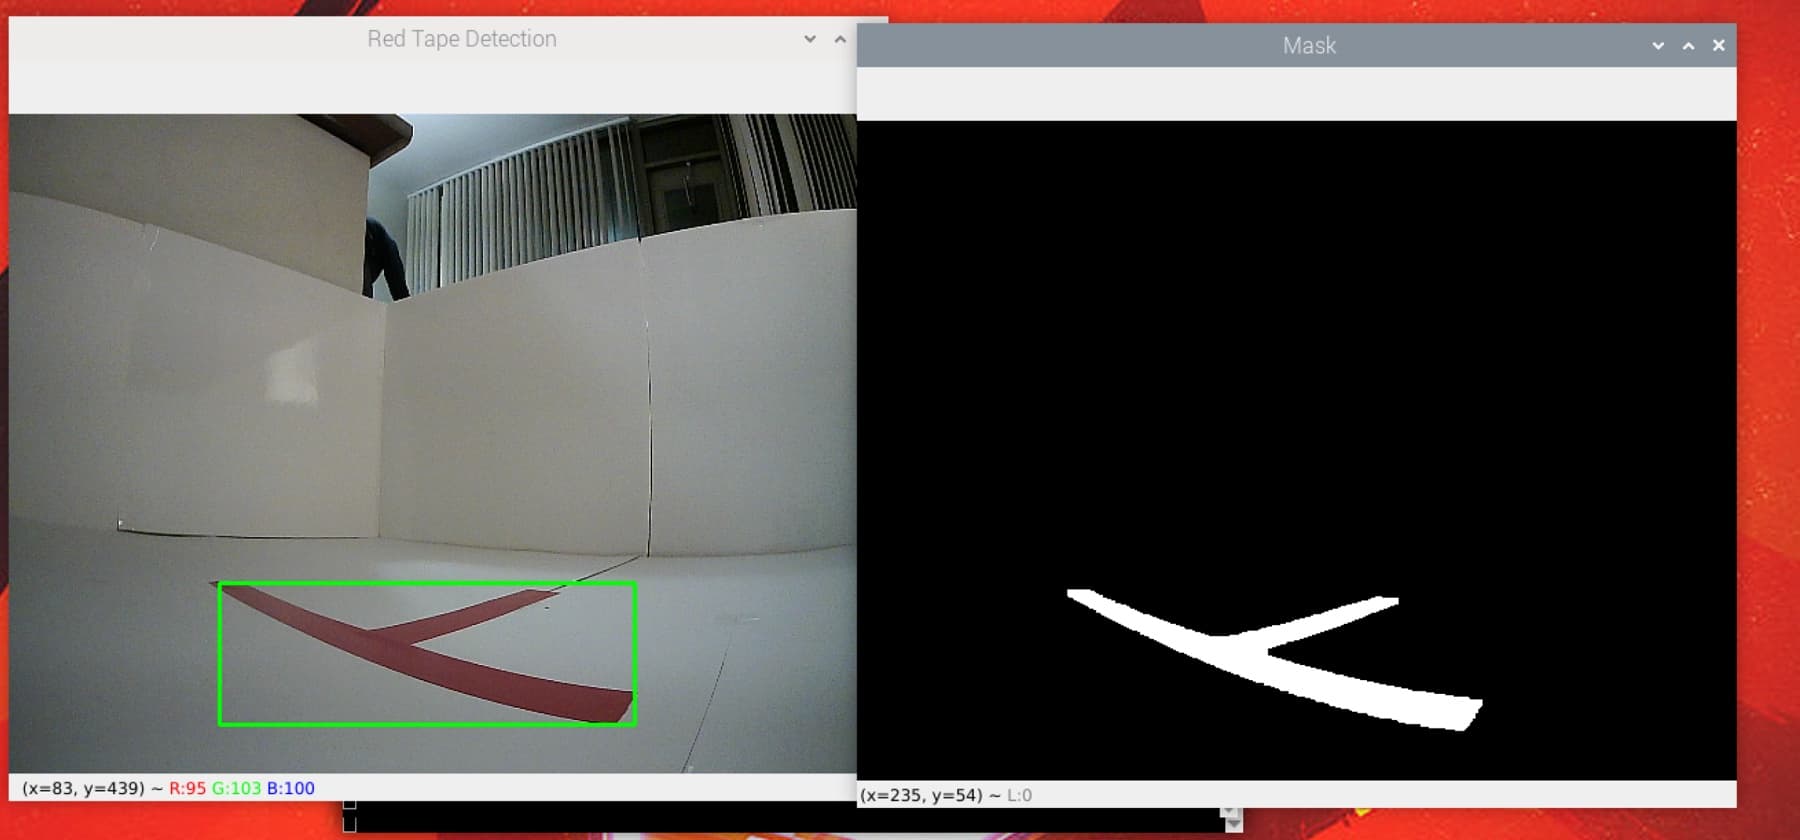
My red-tape detector segmenting the floor tape: the raw camera frame (left) and the binary mask it builds from two HSV colour bands (right), which the planner treats as a no-go region.
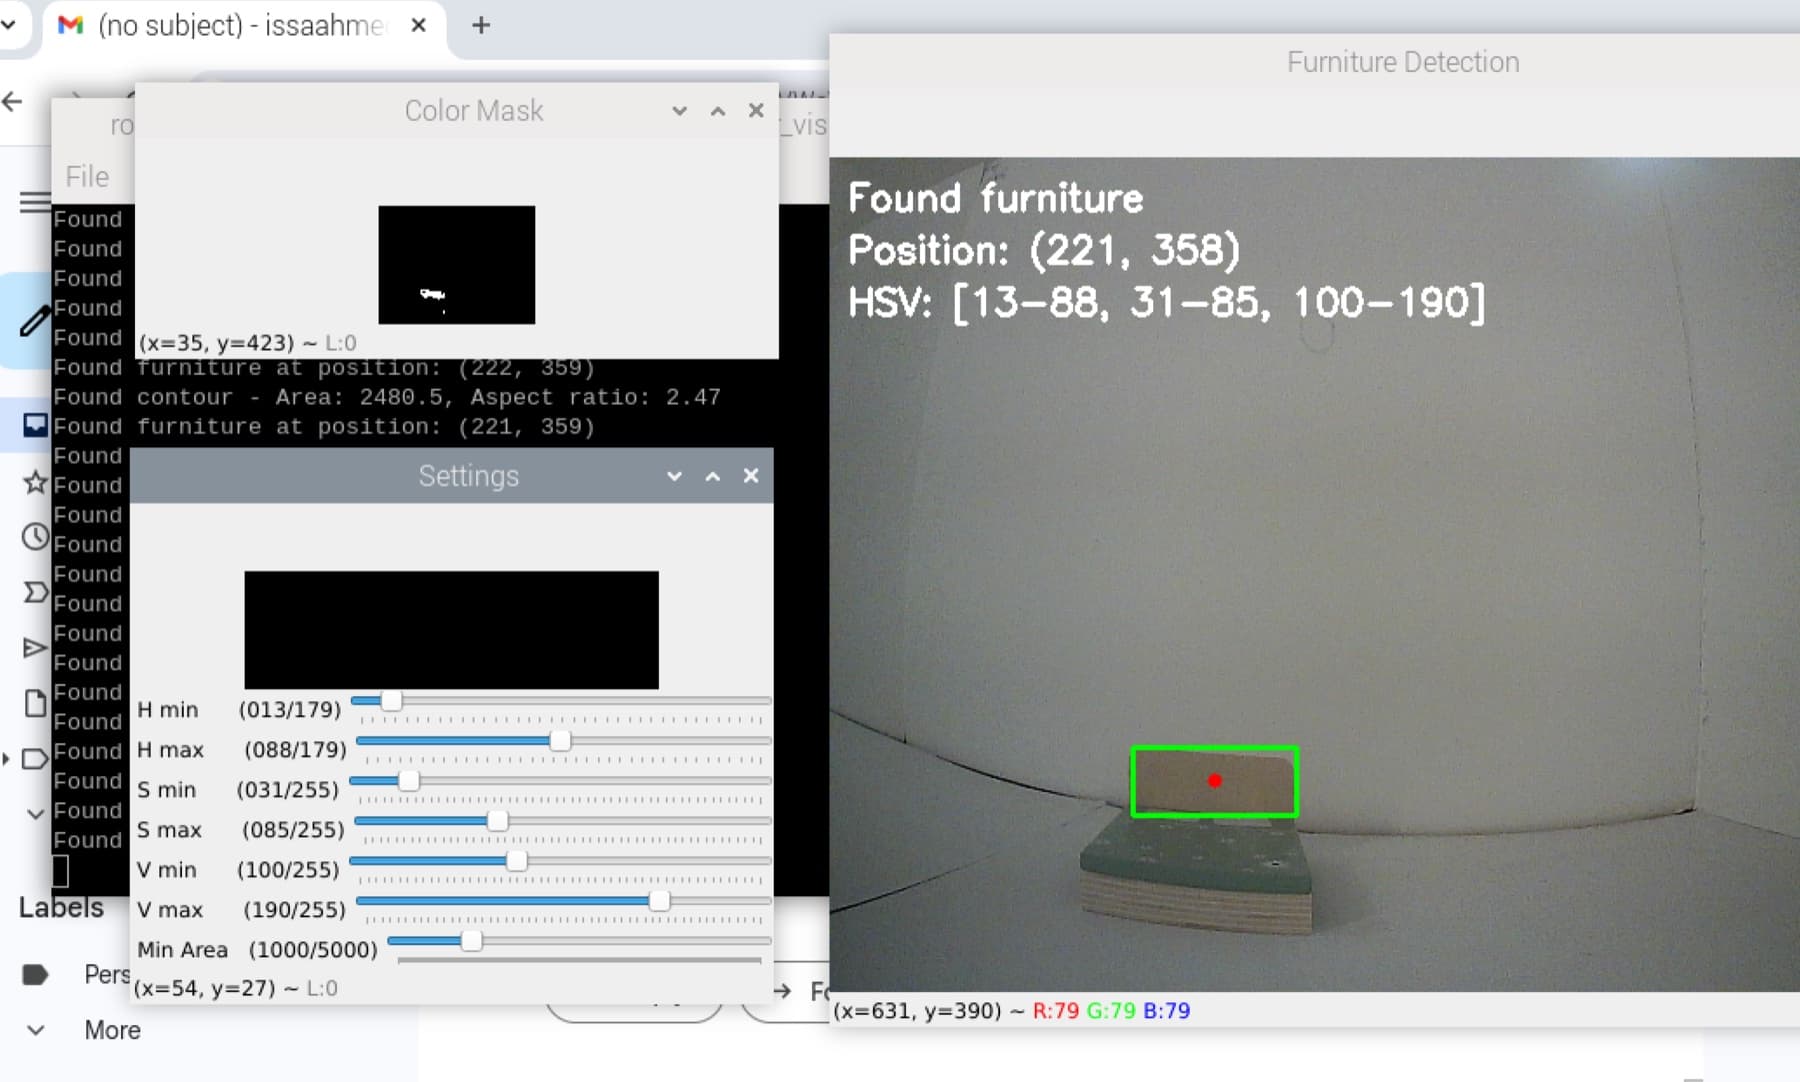
My furniture detector keying on the bedroom's bed: colour, aspect ratio, and the bed's flower pattern combine into a labelled hit, alongside the colour mask and the HSV controls I tuned it with.
I also built the whole navigation loop as a parallel software simulation: a turtle-graphics agent with an OpenCV / pyzbar barcode reader, running the scanner and the moving agent as concurrent processes so the agent pauses at each checkpoint until the right code is read. It gave me a clean, controllable testbed for the path-planning and checkpoint logic while the physical build fought real sensor noise.
Results
I delivered a working system on both fronts (a physical robot and the simulation) and recorded a demo of it driving the arena autonomously. In the taped-out five-room "house" I built, the robot localized, planned to named rooms, reacted to obstacles inside 0.5 m, flagged red-tape danger zones, and confirmed arrival by QR code.
TRY IT · RUNS IN YOUR BROWSER
Destination
Pick a room
Idle. Eleven rooms, each with the fixed route I defined for it.
Fixed waypoint routes with QR-gated checkpoints, not live pathfinding. The chair drives to each corridor checkpoint, waits to scan the matching QR code, then continues to the next.
Status log
- Awaiting destination: select a room to begin.
Pick a room: the wheelchair drives the fixed route I defined for it, waiting to scan the right QR checkpoint at each stop before moving on.
NOTE: Honest scope
Tech stack
Software & CV
- Python
- OpenCV
- pyzbar (QR / barcode)
Robotics & Navigation
- ROS2
- Nav2
- SLAM (gmapping / Cartographer)
- route planning
- robot_localization (EKF)
Hardware & Sensors
- Astra depth camera
- 2D lidar
- Raspberry Pi 5
Reflection
The instinct I'm proudest of here is leverage. Building on a capable vendor platform let me put the effort where the actual problem was (the assistive-navigation logic, the hazard detection, the arrival guarantee) instead of re-solving mapping and motion control.
This is also where I first put ROS2, Nav2, SLAM, and OpenCV together on real hardware. It was my introduction to the whole stack, and the groundwork I carried straight into RECLAIM, my mechatronics capstone. Same closed perception → planning → actuation loop, aimed there at clearing a venue floor and here at helping a person move through their own home.